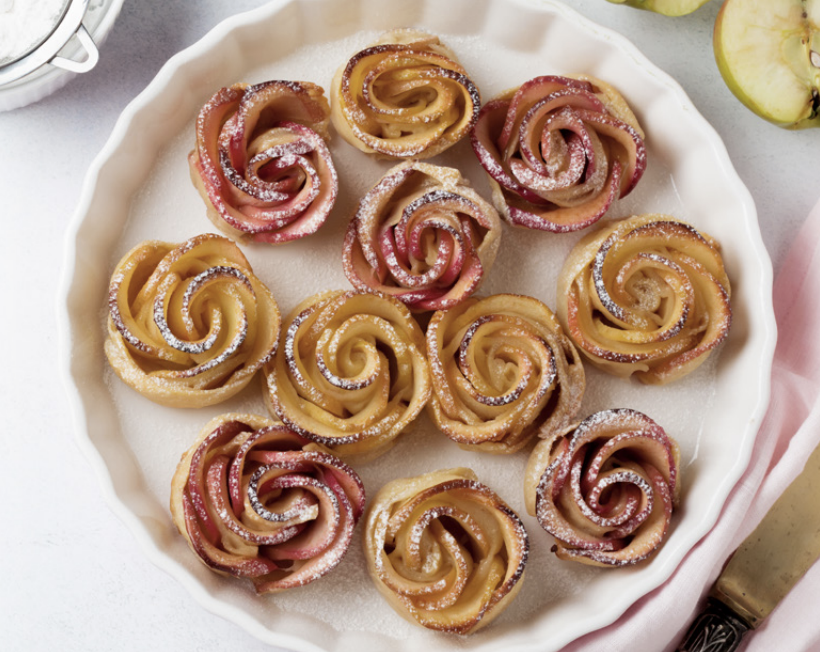
RSS

Easy Butter Chicken

Authentic Butter Chicken Recipe (Easy & Flavorful!)

Looking for a creamy, delicious, and easy-to-make butter chicken recipe? This classic dish combines tender marinated chicken with a rich, spiced tomato-based sauce that will leave your taste buds craving more! Perfect for weeknight dinners or special occasions.

Why You’ll Love This Recipe

  • Restaurant-style flavor: Achieve the creamy, buttery taste of authentic butter chicken at home.

  • Simple ingredients: Everything you need is easy to find.

  • Make-ahead option: Marinate the chicken overnight for even more flavor!

Let’s get started!


Ingredients for Butter Chicken

Chicken Marinade

  • 2.2 lb boneless, skinless chicken (cut into cubes)

  • 2 tbsp lemon juice

  • 2 cloves garlic, minced

  • 1 tbsp garam masala

  • 1 tbsp kosher salt

Butter Chicken Sauce

  • 1/4 cup vegetable oil

  • 2 1/2 cups chopped onion

  • 2 tbsp coarsely chopped garlic

  • 2 tbsp garam masala

  • 2 tbsp paprika

  • 1/4 tsp cinnamon

  • 2 tsp kosher salt

  • 2 cups diced, no-salt-added canned tomatoes

  • 3/4 cup heavy cream (35% or whipping cream)

  • 2 tbsp butter

  • Chopped cilantro (for garnish)


Step-by-Step Instructions

1. Marinate the Chicken

  1. In a large bowl, combine the cubed chicken, lemon juice, minced garlic, garam masala, and kosher salt.

  2. Massage the chicken well to ensure the spices coat evenly.

  3. Let the chicken sit at room temperature while you prepare the sauce, or marinate it in the refrigerator overnight for deeper flavor.


2. Prepare the Sauce

  1. Heat the vegetable oil in a large saucepan over medium heat.

  2. Add the chopped onions and cook slowly until golden brown (about 15 minutes). This step adds sweetness to the sauce.

  3. Add the garlic and stir it in with the onions until fragrant.

  4. Mix in the garam masala, paprika, cinnamon, and kosher salt. Stir for about 1 minute to bloom the spices.

  5. Pour in the diced tomatoes and cook for 2 minutes.

  6. Reduce the heat, then slowly add the heavy cream while stirring.


3. Blend the Sauce

  1. Use a handheld immersion blender (or transfer to a blender) to blend the sauce until smooth and creamy.

  2. Once blended, return the sauce to the saucepan and bring to a gentle simmer.


4. Cook the Chicken

  1. Remove the marinated chicken from the bowl and place it into the simmering sauce.

  2. Cover the saucepan and cook on medium heat for 15 minutes.

  3. Check that the chicken is fully cooked (no longer pink inside) before proceeding.


5. Finish & Garnish

  1. Stir in the butter until melted, adding a rich, velvety finish to the sauce.

  2. Sprinkle with freshly chopped cilantro for a burst of color and flavor.


Serving Suggestions

  • Serve your butter chicken with fluffy basmati rice or warm naan bread for a complete meal.

  • Pair with a side of cucumber raita or a simple green salad for a refreshing contrast.


Pro Tips for the Perfect Butter Chicken

  • Marinate overnight: Allowing the chicken to marinate longer deepens the flavor.

  • Don’t skip the blending: Blending the sauce creates the signature creamy texture.

  • Adjust spice levels: If you prefer less heat, reduce the garam masala or paprika.


Frequently Asked Questions (FAQs)

1. Can I use chicken thighs instead of chicken breasts?

Absolutely! Chicken thighs are juicier and work beautifully in this recipe.

2. How can I make this dish dairy-free?

Swap the heavy cream for full-fat coconut milk and use vegan butter.

3. Can I freeze butter chicken?

Yes! Allow the dish to cool completely, then store in an airtight container for up to 3 months. Reheat on the stovetop with a splash of water or cream.


Nutrition Information

Serving size: 1 portion (serves 6)

  • Calories: ~400 per serving

  • Protein: ~30g

  • Fat: ~20g

  • Carbs: ~12g


Final Thoughts

This butter chicken recipe is easy to make and guaranteed to impress your family and friends. With its bold spices, creamy sauce, and tender chicken, it’s a true comfort food classic.

Did you try this recipe? Share your thoughts and photos in the comments below! Don’t forget to pin this recipe for later or share it with your friends.


Enjoy your homemade butter chicken!

Read

Bacon and Egg Pastries with Cheddar – A Savory Breakfast Delight

If you're looking for an easy and delicious breakfast or brunch recipe, these Bacon and Egg Pastries with Cheddar are a must-try! With a flaky, buttery crust, crispy bacon, gooey cheese, and perfectly cooked eggs, this dish is simple to prepare yet packed with flavor. Whether you're hosting brunch or making a quick family meal, these pastries will be a hit!

Why You'll Love This Recipe

  • Quick & Easy – Perfect for busy mornings.

  • Savory & Satisfying – Bacon, eggs, and cheese make a hearty and flavorful combination.

  • Customizable – Swap cheddar for your favorite cheese or add veggies for extra flavor.

  • Great for Any Meal – Ideal for breakfast, brunch, or even a light dinner.

Ingredients

  • Butter (for greasing)

  • 1 lb prepared pie dough (store-bought or homemade, see recipe below)

  • All-purpose flour (for dusting and rolling)

  • 2 tbsp Dijon mustard

  • 12 slices lean bacon, diced, cooked, and drained

  • 12 small eggs

  • Salt and pepper (to taste)

  • 1 cup grated old cheddar cheese

  • 2 tbsp chopped parsley

Instructions

Step 1: Prepare the Dough

  1. Preheat your oven to 350°F (175°C).

  2. Lightly grease a 12-cup deep muffin pan with butter.

  3. Roll out the pie dough on a floured surface to 1/4-inch thickness.

  4. Cut out 12 circles (about 5 inches in diameter). Use a large drinking glass or a round cutter.

  5. Gently press each dough circle into the muffin cups, pleating the edges as needed.

Step 2: Assemble the Pastries

  1. Brush 1/2 tsp Dijon mustard into the bottom of each pastry cup.

  2. Evenly distribute the cooked bacon among the cups.

  3. Crack the eggs into a bowl. Spoon the yolks into each pastry cup.

  4. Gently spoon the egg whites over the yolks, filling about 2/3 full (do not overfill).

  5. Season with salt and pepper to taste.

  6. Sprinkle the grated cheddar cheese evenly over the top.

Step 3: Bake

  1. Place the muffin pan in the preheated oven.

  2. Bake for 20-25 minutes, or until the eggs are set and the cheese is golden brown.

  3. Remove from the oven and let cool slightly before serving.

Step 4: Garnish and Serve

  1. Sprinkle chopped parsley over the warm pastries.

  2. Serve immediately and enjoy!


Homemade Pie Dough Recipe

If you prefer homemade pastry, here's a simple pie dough recipe that works perfectly for these breakfast pastries.

Ingredients

  • 2 1/2 cups all-purpose flour

  • 1 tsp salt

  • 2 tbsp sugar

  • 3/4 cup unsalted butter (chilled, cut into cubes)

  • 1/2 cup vegetable shortening

  • 6-8 tbsp ice water (adjust as needed)

Instructions

  1. In a food processor, combine flour, salt, and sugar; pulse to mix.

  2. Add butter and pulse 4 times.

  3. Add shortening in small chunks and pulse 4 more times.

  4. Sprinkle in 6 tbsp ice water and pulse until dough begins to clump.

  5. If needed, add more ice water, 1 tbsp at a time, until the dough holds together.

  6. Divide dough into 2 balls, flatten into disks, wrap in plastic, and refrigerate for at least 1 hour before rolling out.


Final Thoughts

These Bacon and Egg Pastries with Cheddar are an easy, delicious, and satisfying meal for any time of day. They’re perfect for meal prepping, brunch gatherings, or a quick weekday breakfast. Try them with different cheeses, herbs, or even a dash of hot sauce for extra flavor!

Pro Tip:

Store leftovers in an airtight container in the fridge and reheat in the oven at 300°F for 5-7 minutes for best results.

Read

Cranberry-Stuffed Chicken with Maple Orange Glaze

Cranberry-stuffed chicken is a delicious and elegant meal that's surprisingly easy to prepare. This recipe was inspired by a classic Rose Reisman dish, but I've made some adjustments to suit my family's tastes and portion needs. Instead of using chicken supreme, I opted for a light breading, making the dish crisp and flavorful while keeping it healthier.

My youngest has recently developed a love for all things cranberry, so this dish was a special request. The combination of tart cranberries, crunchy almonds, and creamy Havarti cheese creates a mouthwatering stuffing, while the maple-orange glaze adds a perfect balance of sweet and savory flavors. This meal comes together in about 45 minutes, making it a great option for a weeknight dinner or a special occasion.

Why You’ll Love This Cranberry-Stuffed Chicken Recipe

  • Perfectly balanced flavors: The sweetness of maple syrup and orange juice contrasts beautifully with the tart cranberries and savory chicken.

  • Crispy yet tender: A light breading gives the chicken a golden crust without being too heavy.

  • Easy to prepare: Despite its gourmet presentation, this dish is simple and comes together quickly.

Ingredients

For the Chicken:

  • 1.5 lbs boneless, skinless chicken breasts (six breasts)

  • 1/4 cup bread crumbs

  • 1 egg

  • 1/4 cup skim milk

For the Stuffing:

  • 3/4 cup dried cranberries

  • 1/3 cup toasted almonds

  • 1/2 tsp cinnamon

  • 2 tsp olive oil

  • 3/4 cup shredded light Havarti cheese

For the Sauce:

  • 1/4 cup maple syrup

  • 1/4 cup thawed concentrated orange juice

  • 1 tbsp honey

  • 1 tbsp low-sodium soy sauce

  • 2 tsp sesame oil

  • 1 1/2 tsp Dijon mustard

  • 1 tsp finely chopped garlic

  • 1 1/2 tsp cornstarch

Garnish:

  • Fresh chopped parsley

Directions

Step 1: Prepare the Chicken

Preheat your oven to 400°F. Make a horizontal slit in each chicken breast to create a pocket for the stuffing, being careful not to slice all the way through.

Step 2: Make the Stuffing

In a food processor, pulse the cranberries and almonds until finely chopped. Add the cinnamon, olive oil, and shredded Havarti cheese, then process for about a minute until well combined.

Stuff each chicken breast with the cranberry mixture and secure the opening with toothpicks to keep the filling inside.

Step 3: Coat and Sear the Chicken

In a small bowl, whisk together the egg and skim milk. Dip each stuffed chicken breast into the egg mixture, then coat evenly with breadcrumbs.

Lightly coat a large non-stick skillet with cooking spray and heat over medium-high heat. Spray the breaded chicken lightly with cooking spray and cook for about 3 minutes per side, until golden brown. Transfer the chicken to a foil-lined baking sheet coated with cooking spray.

Step 4: Bake to Perfection

Place the chicken in the preheated oven and bake for 20-30 minutes, or until the internal temperature reaches 165°F.

Step 5: Prepare the Sauce

While the chicken bakes, whisk together the maple syrup, orange juice, honey, soy sauce, sesame oil, Dijon mustard, and garlic in a small saucepan over medium heat. Add the cornstarch and whisk well.

Bring to a boil, then reduce the heat and let it simmer for about a minute, until slightly thickened.

Step 6: Serve and Enjoy

Remove the toothpicks from the chicken and plate. Drizzle the warm maple-orange glaze over each piece and garnish with fresh parsley. Serve with rice, roasted vegetables, or a fresh green salad for a complete meal.

Pro Tips for the Best Cranberry-Stuffed Chicken

  • Don’t overstuff: While you want a good amount of filling, overstuffing may cause the chicken to burst open during cooking.

  • Secure with toothpicks: This prevents the stuffing from leaking out while cooking.

  • Use a meat thermometer: Ensuring the chicken reaches 165°F guarantees it's fully cooked without drying out.

Serving Suggestions

Pair this cranberry-stuffed chicken with:

  • Steamed jasmine rice or wild rice blend to soak up the sauce.

  • Roasted Brussels sprouts or asparagus for a vibrant side.

  • A glass of white wine, such as Chardonnay or Riesling, for a perfect pairing.

Final Thoughts

This Cranberry-Stuffed Chicken with Maple Orange Glaze is a delightful combination of textures and flavors that will impress your family and guests alike. It's easy enough for a weeknight meal but elegant enough for a dinner party. The tangy-sweet stuffing and luscious sauce make it a dish worth repeating.

Give it a try and let me know how it turns out! If you make any tweaks, I’d love to hear about them in the comments.

Read

Hearty One-Pot Lamb Stew Recipe – A Comforting Classic

Lamb stew is often associated with special occasions like St. Patrick’s Day, but this hearty one-pot dish is so easy and flavorful that it deserves a spot in your regular meal rotation. With minimal hands-on time, this slow-simmered stew develops deep, rich flavors while requiring little effort. Whether you're feeding a crowd or looking for delicious leftovers, this recipe is a must-try!

Why You’ll Love This Lamb Stew Recipe

  • Easy One-Pot Meal: Less cleanup and maximum flavor.

  • Rich and Hearty: Slow-cooked for a tender, melt-in-your-mouth texture.

  • Perfect for Any Occasion: Great for holidays or cozy family dinners.

  • Meal Prep Friendly: Enjoy leftovers that taste even better the next day.

Ingredients You’ll Need

Main Ingredients:

  • 1 1/2 pounds lamb stew meat

  • 2 tablespoons olive oil, divided

  • 3 large onions, quartered

  • 3 medium carrots, cut into 1-inch pieces

  • 4 small potatoes, peeled and cubed

  • 1 can (14 1/2 ounces) beef broth

  • 3/4 teaspoon salt

  • 1/4 teaspoon pepper

For Thickening and Seasoning:

  • 1 tablespoon butter

  • 1 tablespoon all-purpose flour

  • 1 1/2 teaspoons fresh parsley, minced

  • 1 1/2 teaspoons chives, minced

  • 1/2 teaspoon fresh thyme, minced

Step-by-Step Cooking Instructions

1. Brown the Lamb

In a Dutch oven, heat 1 tablespoon of olive oil over medium heat. Add the lamb stew meat and cook until browned on all sides. Remove the meat with a slotted spoon and set aside.

2. Sauté the Vegetables

In the same pot, add the remaining olive oil along with the onions and carrots. Cook for about 5 minutes, stirring occasionally, until the onions become tender.

3. Simmer the Stew

Add the potatoes, beef broth, salt, pepper, and browned lamb back into the pot. Bring to a boil, then remove from heat. Cover and transfer to a preheated oven at 350°F. Let it bake for 50-60 minutes, or until the meat and vegetables are fork-tender.

4. Prepare the Sauce

Once the stew is done, use a slotted spoon to transfer the meat and vegetables to a large bowl. Keep warm. Pour the pan juices into a separate bowl and set aside.

In the same Dutch oven, melt the butter over medium heat. Stir in the flour until smooth, then gradually whisk in the reserved pan juices. Bring to a boil and cook for about 2 minutes, stirring continuously, until the sauce thickens.

5. Add Fresh Herbs & Serve

Stir in the minced parsley, chives, and thyme. Return the meat and vegetables to the pot, heat everything through, and serve hot.

Pro Tips for the Best Lamb Stew

  • Use Fresh Herbs: Fresh thyme, chives, and parsley add vibrant flavors.

  • Opt for Bone-In Lamb (If Available): It enhances the broth’s richness.

  • Don’t Rush the Cooking Time: Slow baking allows flavors to meld beautifully.

  • Make It Ahead: The stew tastes even better the next day!

What to Serve with Lamb Stew

  • Crusty Bread: Perfect for soaking up the delicious sauce.

  • Steamed Green Beans: A fresh, crisp contrast to the rich stew.

  • Red Wine: A bold red like Cabernet Sauvignon pairs beautifully.

Final Thoughts

This easy one-pot lamb stew is the ultimate comfort food. Whether you’re making it for a special occasion or a weeknight meal, it’s a dish that will warm your heart and satisfy your hunger. Plus, the leftovers are just as tasty the next day!

Read

How to Make a Stunning Tree Frog Cake

Looking for a show-stopping cake that’s both fun and creative? This Tree Frog Cake is the perfect choice for birthdays, celebrations, or just an exciting weekend baking project. It’s a labor-intensive but incredibly rewarding cake that will impress kids and adults alike. Let’s get started!

Why You’ll Love This Cake

  • Perfect for frog lovers and nature enthusiasts

  • A fun and creative baking project for families

  • Customizable with fondant decorations

  • Guaranteed to be the centerpiece of any event

Ingredients & Supplies

Cake & Base

  • Your favorite white cake recipe (or boxed mix with enhancements)

  • 1 package instant pudding mix (for extra moisture)

  • Buttermilk (to replace water in cake mix)

  • Wilton’s Medium and Extra Small Hexagon Pans

  • Non-stick spray (such as Pam)

Cake Prep & Sealing

  • 1 jar apple or apricot jelly

  • Buttercream icing (your favorite recipe)

Decorations

  • Marshmallow fondant (homemade or store-bought)

  • Spectra food coloring gel

  • Icing bags and round piping tip

Step-by-Step Instructions

1. Bake the Cake

Start by preparing your white cake batter. If using a box mix, enhance it with pudding mix and buttermilk for a richer texture. Grease the hexagon pans generously and bake according to the recipe instructions. Once baked, let them cool slightly.

2. Seal in the Moisture

While the cakes are still warm, trim the tops to create a flat surface. Microwave the jelly for 1-2 minutes until liquefied, then brush it over the entire cake to seal in moisture and prevent crumbs. Let cool completely.

Alternatively, you can apply a thin layer of buttercream icing, refrigerate for 30 minutes, and then add another layer for a smooth finish.

3. Create the Fondant Decorations (Do This a Day Ahead)

Make marshmallow fondant and mold the frog bodies, arms, legs, and eyes. Let them dry overnight before painting them with food coloring gel diluted in water. This will give them a vibrant, natural look.

For the leaves, roll out green fondant and cut out leaf shapes. Let these dry overnight as well.

4. Assemble & Decorate

  • Frost the cake with buttercream icing, reserving some for piping tree details.

  • Use a round piping tip to pipe trees onto the cake and add fondant leaves.

  • Arrange the frog pieces, pressing them gently into the buttercream so they stay in place.

  • Make any final adjustments to positioning before taking pictures of your masterpiece!

Final Thoughts

Creating a Tree Frog Cake is a true labor of love, but the result is an unforgettable cake that will wow everyone. Whether you’re making it for a birthday or just for fun, this cake is a fantastic way to get creative in the kitchen.

Have you tried making this cake? I’d love to see your creations! Send me your pictures, and I’ll feature them on the blog.

Read

Homemade Chicken Caprese Ravioli Recipe

This Chicken Caprese Ravioli recipe combines tender homemade pasta, a flavorful rotisserie chicken filling, and a fresh basil-lemon sauce that brings everything together beautifully. Perfect for date nights, family dinners, or when you want to impress guests with an Italian-inspired meal!


Why You'll Love This Recipe

  • Fresh & Flavorful: The combination of ricotta, chicken, basil, and lemon zest creates a light yet satisfying dish.

  • Homemade Ravioli: Simple steps to make fresh pasta dough from scratch with minimal ingredients.

  • Impressive Yet Simple: While ravioli looks fancy, this step-by-step guide ensures it’s easy and fun to make.


Ingredients

For the Dough:

  • 2 1/2 cups all-purpose flour (plus extra for dusting)

  • 1 cup very hot water

For the Filling:

  • 3/4 cup whole milk ricotta

  • 1 large egg

  • 1/2 cup finely shredded store-bought rotisserie chicken

  • 1/4 cup grated parmesan

  • 2 tablespoons finely chopped fresh basil leaves

  • 1/2 teaspoon salt

  • 1/4 teaspoon freshly ground black pepper

For the Sauce:

  • 3 tablespoons extra virgin olive oil

  • 3 tablespoons chopped fresh basil leaves

  • 2 teaspoons grated lemon zest

  • 1/2 teaspoon salt

  • 1/4 teaspoon freshly ground black pepper


Instructions

1. Make the Dough

  • In a large bowl, combine the flour and very hot water.

  • Using a wooden spoon, mix until it forms a large ball.

  • Cover the dough with plastic wrap and let it rest for 10 minutes.

    • Shortcut Tip: Use a stand mixer with a dough hook for easier mixing. Gradually add water to the flour until a dough ball forms.

2. Prepare the Filling

  • In a medium bowl, combine the ricotta, egg, shredded chicken, parmesan, chopped basil, salt, and black pepper.

  • Stir to combine thoroughly.

    • Pro Tip: Use a food processor to shred the chicken and mix the filling for a smoother texture.

3. Roll Out the Dough

  • Divide the dough into 4 equal pieces.

  • Lightly dust the work surface and rolling pin with flour.

  • Roll out one piece of dough into a 4x19-inch rectangle.

    • If the dough is sticky, add small amounts of flour as needed.

4. Fill & Seal the Ravioli

  • Place 9 rounded teaspoons of filling down the center of the dough, spacing each about 1 inch apart.

  • Fold the dough over the filling, covering it completely.

  • Press down around the edges of each ravioli with your fingertips to seal.

  • Use a knife or ravioli cutter to cut the dough into squares.

  • Press down around the edges again to ensure each ravioli is sealed.

  • Place the finished ravioli on a lightly floured baking tray and repeat the process with the remaining dough and filling.

5. Cook the Ravioli

  • Bring a large pot of salted water to a boil.

  • Add half the ravioli and cook until they float to the surface (about 3-4 minutes), stirring occasionally.

  • Drain and transfer to a large bowl. Repeat with the remaining ravioli.

6. Prepare the Sauce & Serve

  • Drizzle the olive oil over the cooked ravioli.

  • Add the fresh basil, lemon zest, salt, and pepper.

  • Gently toss the ravioli to coat in the sauce.

  • Serve immediately while warm.


Serving Suggestions

  • Pair this fresh Chicken Caprese Ravioli with a light arugula salad dressed in a lemon vinaigrette.

  • Serve alongside warm, crusty bread to soak up the delicious sauce.

  • A chilled glass of Pinot Grigio or Sauvignon Blanc complements the fresh basil and lemon perfectly.


Pro Tips

  • Work in Batches: Keep the dough you’re not using covered to prevent it from drying out.

  • Ravioli Molds: For consistent results, use a ravioli mold for shaping and sealing the pasta.

  • Freeze for Later: You can freeze uncooked ravioli on a tray, then store in an airtight container. Boil directly from frozen when ready.


Final Thoughts

This Homemade Chicken Caprese Ravioli combines rustic Italian flavors with fresh ingredients for a dish that feels gourmet yet simple. The basil-lemon sauce is a perfect finishing touch, making every bite light, fragrant, and satisfying.

Read

Creamy Tuscan Chicken with Mushrooms, Spinach & Cherry Tomatoes

This Creamy Tuscan Chicken recipe combines tender chicken thighs, earthy mushrooms, vibrant spinach, and juicy grape tomatoes in a luscious Parmesan cream sauce. It’s a comforting, restaurant-quality dish that’s perfect for weeknight dinners or special occasions. Pair it with pasta, rice, or crusty bread to soak up the rich sauce!


Ingredients for Creamy Tuscan Chicken

For the Dish

  • 1/2 (142 g) package baby spinach

  • 0.45 kg boneless, skinless chicken thighs

  • 0.23 kg cremini mushrooms, sliced

  • 1 clove garlic, minced

  • 1/2 small package grape tomatoes

  • 1/2 medium yellow onion, diced

For the Sauce

  • 118 ml heavy whipping cream

  • 28 g Parmesan cheese, finely grated

  • 1 tbsp unsalted butter

  • 1/4 tsp crushed red pepper (adjust to taste)

  • 1/2 tsp Italian seasoning

  • Salt and pepper to taste


Step-by-Step Directions

Step 1: Prep the Ingredients

  • Wash and dry the produce: cremini mushrooms, grape tomatoes, and spinach.

  • Dice the onion, mince the garlic, and slice the mushrooms. Pat chicken thighs dry with a paper towel and season both sides with salt and pepper.

Step 2: Cook the Aromatics

  • Heat a skillet over medium heat. Once hot, add butter and swirl to coat the bottom. Add the diced onion and minced garlic. Cook for 2–3 minutes, stirring regularly, until the onion begins to soften.

Step 3: Sear the Chicken

  • Add the seasoned chicken thighs to the skillet. Sear for about 2 minutes per side until golden brown. Transfer the chicken to a plate and cover loosely with foil. Note: The chicken will not be fully cooked at this stage.

Step 4: Cook the Vegetables

  • Add sliced mushrooms to the skillet and cook until golden brown, about 2–3 minutes. Add the spinach in batches, stirring until it wilts slightly before adding more. Add grape tomatoes, crushed red pepper, and Italian seasoning. Stir to combine and cook for 2–3 minutes, until the veggies begin to soften.

Step 5: Make the Sauce

  • Pour in the heavy cream and stir gently. Return the chicken (and any juices from the plate) to the skillet. Cover and simmer for 8–10 minutes, or until the chicken is cooked through.

Step 6: Finish with Parmesan

  • Add grated Parmesan cheese to the skillet and stir until melted and combined. Adjust seasoning with salt and pepper as needed.

Step 7: Serve and Enjoy

  • Divide the chicken and vegetables between plates, spooning the creamy sauce over the top. Pair with pasta, rice, or crusty bread for a complete meal.


Serving Suggestions

  • Pair with: Creamy mashed potatoes, buttered pasta, or fluffy white rice.

  • Optional Add-ins: Crumbled bacon, sun-dried tomatoes, or chopped fresh basil for added depth of flavor.

  • Make it Keto: Swap heavy cream for coconut cream and serve over zoodles or cauliflower rice.


Tips for Perfect Creamy Tuscan Chicken

  1. Don’t Overcook the Chicken: Boneless thighs are forgiving, but ensure they stay juicy by simmering just until cooked through.

  2. Adjust the Sauce Consistency: If the sauce becomes too thick, add a splash of chicken broth or cream to thin it out.

  3. Use Fresh Parmesan: Pre-grated Parmesan may not melt as smoothly, so opt for freshly grated for a creamy texture.


Why You’ll Love This Recipe

  • Easy to Make: Simple ingredients and straightforward steps make this recipe weeknight-friendly.

  • Comfort Food: Rich, creamy, and bursting with flavor, it’s the ultimate cozy dish.

  • Customizable: Easily tweak with your favorite vegetables or seasonings.


Final Thoughts

This Creamy Tuscan Chicken is a versatile, one-pan recipe that’s sure to impress your family or dinner guests. Its combination of juicy chicken, fresh vegetables, and a rich cream sauce makes it a dish that’s both hearty and satisfying. Whether you’re cooking for a weeknight meal or a special occasion, this recipe will have everyone asking for seconds!

Read

Sweet Potato Pie: A Family Favorite Tradition

Sweet potato pie has become a cherished addition to Thanksgiving celebrations in Canada, thanks to a special tradition introduced by Marnie’s mum, Peggy. After spending time "snowbirding" in Florida, Peggy and her family met a Pastor and his family, who shared their Thanksgiving tradition of sweet potato pie. It quickly became a favorite in their own home, and now, it's a beloved recipe that you can enjoy with your family too. With its creamy texture and blend of warm spices, this pie is the perfect addition to your holiday menu.


Ingredients for Sweet Potato Pie

To make this delightful pie, you’ll need:

  • 2 single Graham or regular pie crusts

  • 4 cups cooked and peeled sweet potatoes

  • 1/2 cup (1 stick) butter

  • 2/3 cup pure fine granulated sugar

  • 2/3 cup (packed) light brown sugar

  • 4 large eggs

  • 1 cup whole milk (or skim milk)

  • 1 cup plain yogurt (or buttermilk)

  • 1/2 tsp baking soda (added to yogurt or buttermilk)

  • 1/2 tsp salt

  • 1/4 tsp nutmeg

  • 1/4 tsp cinnamon (or more, to taste)


Step-by-Step Directions to Make Sweet Potato Pie

  1. Prepare the Sweet Potatoes
    Start by boiling the sweet potatoes with the skin on until they are soft and a fork or butter knife can easily break them apart. Once done, let them cool slightly. Run cold water over the potatoes in a colander to help remove the skins, as the yams will still be quite hot.

  2. Mash and Mix
    Peel the sweet potatoes and mash them using a mixer on medium speed. You may need to stop frequently to remove any strings from the beaters.

  3. Add the Butter
    While the sweet potatoes are still hot, add the butter and mix it in until fully melted and incorporated.

  4. Beat the Eggs and Sugar
    In a separate bowl, beat the eggs and sugars together until light and fluffy. Gradually fold this mixture into the mashed sweet potatoes.

  5. Incorporate the Milk and Yogurt
    Add the milk and yogurt (mixed with the baking soda) to the sweet potato mixture. Stir to combine.

  6. Season the Pie
    Add salt, cinnamon, and nutmeg to the mixture, adjusting the spices to your taste. Stir until well combined.

  7. Prepare the Pie Crust
    Pour the sweet potato mixture into the prepared pie crusts. If you prefer, you can bake the mixture as a pudding instead, skipping the crust entirely.

  8. Bake to Perfection
    Bake the pie at 350°F (175°C) for about 70 minutes, or until a toothpick comes out clean when inserted into the center.


Serving and Storing

This sweet potato pie is best served slightly warm or at room temperature. You can store leftovers in the fridge for up to 3 days. It also freezes well for up to a month—just let it cool completely, wrap it tightly, and pop it in the freezer for later enjoyment.


Final Thoughts

Sweet potato pie is the epitome of comfort food, blending the smooth, naturally sweet flavor of sweet potatoes with the warmth of cinnamon and nutmeg. It’s a wonderful addition to any holiday table or as a special treat to enjoy with family and friends. This recipe, handed down from Peggy’s Thanksgiving tradition, is a reminder of the joy of sharing delicious food and creating memories that last a lifetime. Enjoy a slice of this rich, flavorful pie with a dollop of whipped cream or a scoop of vanilla ice cream for the ultimate dessert experience.

Read

Colourful Peppermint Meringues: A Festive and Light Treat

These Colourful Peppermint Meringues are the perfect festive treat! Light, airy, and full of peppermint flavor, these meringues are a fun and easy way to brighten up any occasion. With a delightful red swirl from the food coloring, they’re as pleasing to the eyes as they are to the taste buds. Whether for holiday celebrations, gifting, or just as a light dessert, these meringues will surely impress.


Ingredients for Colourful Peppermint Meringues

  • 3 egg whites

  • 1/4 tsp cream of tartar

  • 1/4 tsp salt

  • 1/4 tsp pure peppermint extract

  • 3/4 cup sugar

  • Red food coloring (paste or gel)


Directions for Colourful Peppermint Meringues

1. Preheat and Prepare

Preheat your oven to 200°F (93°C) and line a cookie sheet with parchment paper. Set aside for later use.

2. Whip the Egg Whites

In a large bowl, combine egg whites, cream of tartar, salt, and peppermint extract. Using an electric mixer, beat on medium-high speed until soft peaks begin to form.

3. Add Sugar

Slowly add sugar—about 1 tablespoon at a time—while continuing to beat on high. Keep mixing until the meringue forms stiff peaks and is glossy.

4. Prepare the Piping Bag

Fit a large piping bag with a large star tip. Using a small, clean paintbrush, gently paint stripes of red food coloring on the inside of the piping bag from the tip upwards. This will create the beautiful red swirls when you pipe the meringues.

5. Pipe the Meringues

Carefully spoon the meringue mixture into the piping bag and pipe 2-inch stars onto the prepared cookie sheets, spacing them about 1 inch apart.

6. Bake

Bake the meringues in the preheated oven for 90 minutes, or until they feel dry and firm to the touch. You don’t want them to brown, just dry out completely.

7. Cool and Store

Once baked, slide the parchment paper off the cookie sheet and onto a wire rack to cool. Let them cool completely before removing from the parchment. Store the meringues in layers separated by waxed paper in an airtight container. These meringues can also be frozen for up to 3 months.


Why You’ll Love These Colourful Peppermint Meringues

These Colourful Peppermint Meringues are a delightful combination of light, airy texture and refreshing peppermint flavor. The gentle sweetness pairs perfectly with the crisp, melt-in-your-mouth texture of the meringue. The red stripes give these meringues a festive touch, making them ideal for holiday gatherings, parties, or simply enjoying a delicious, guilt-free treat.


Tips for Perfect Meringues

  • Stiff Peaks: Make sure to beat the egg whites until they form stiff peaks—this helps give the meringues their signature light and airy texture.

  • Food Coloring: Use gel or paste food coloring to avoid adding too much liquid to the meringue, which could affect the texture.

  • Oven Temperature: Don’t rush the baking process. Bake at a low temperature to ensure the meringues dry out properly without browning.

  • Storage: These meringues can be stored in an airtight container for up to 3 months and even frozen, making them a great make-ahead treat.


Final Thoughts on Colourful Peppermint Meringues

These Colourful Peppermint Meringues are a simple yet stunning treat that adds a splash of color and flavor to any occasion. Perfect for those who love light, airy desserts, these meringues combine the festive flavors of peppermint with a fun, swirled appearance. Whether you’re preparing for a holiday celebration or just want a sweet snack, these meringues will be a hit!

Read

Hearty Beef, Mushroom & Guinness Pie

This Beef, Mushroom & Guinness Pie is a comfort food classic that combines tender beef, earthy mushrooms, and rich Irish stout, all baked under a flaky puff pastry crust. Perfect for chilly evenings or any time you’re craving a rustic, flavorful dish. Serve it as the centerpiece of a hearty meal with mashed potatoes or a fresh side salad.

This recipe became a family favourite after our family trip to Ireland


Ingredients for Beef, Mushroom & Guinness Pie

For the Filling

  • 3 tablespoons olive oil (divided)

  • 1 lb cubed beef stew meat

  • 3 slices bacon, chopped

  • 1 white onion, chopped

  • 1 carrot, chopped

  • 1/3 lb crimini mushrooms, sliced

  • 1 stalk celery, chopped

  • 1 garlic clove, crushed

  • 1 1/2 tablespoons all-purpose flour

  • 1 cup Irish stout beer (such as Guinness)

  • 1 1/4 cups beef stock

  • 1/2 teaspoon thyme

  • 2 bay leaves

  • 1/2 teaspoon cornstarch (optional, for thickening)

  • 1 teaspoon water (to mix with cornstarch)

  • 1 teaspoon Worcestershire sauce

  • Salt and pepper to taste

For the Crust

  • 1 sheet frozen puff pastry, thawed

  • 1 egg, beaten


Step-by-Step Directions

Step 1: Sear the Beef

  • Heat 2 tablespoons of olive oil in a large pot over medium heat.

  • Add the beef stew meat and brown it on all sides, about 10 minutes. Remove the beef and set it aside.

Step 2: Cook the Bacon and Vegetables

  • Heat the remaining 1 tablespoon of olive oil in the same pot.

  • Cook the chopped bacon until it begins to brown, then stir in the onion, carrot, mushrooms, celery, garlic, and a pinch of sugar.

  • Sauté the vegetables until soft and lightly browned, about 10–15 minutes.

Step 3: Build the Stew

  • Sprinkle the flour over the vegetables and stir until it’s fully incorporated.

  • Gradually pour in the Irish stout beer and beef stock, stirring constantly to prevent lumps.

  • Add the thyme, bay leaves, and the reserved beef. Cover the pot and bring the mixture to a boil, then reduce the heat to a simmer.

  • Cook for 1 hour and 15 minutes, stirring occasionally, until the beef is tender.

Step 4: Thicken the Stew (Optional)

  • Remove the lid and increase the heat to medium.

  • Let the stew boil gently for about 15 minutes to thicken slightly.

  • If needed, mix cornstarch with water and stir it into the stew. Simmer for an additional 30 minutes.

  • Remove from heat and discard the bay leaves.

Step 5: Assemble the Pie

  • Preheat your oven to 350°F (175°C).

  • Spoon the beef and mushroom filling into a 9-inch pie dish.

  • Roll out the thawed puff pastry into a circle large enough to cover the dish (approximately 10 inches).

  • Lay the pastry over the filling, trimming any excess, and crimp the edges with a fork to seal. Cut two small steam vents into the top of the pastry.

Step 6: Bake the Pie

  • Brush the top of the puff pastry with beaten egg for a golden finish.

  • Bake in the preheated oven for 30–40 minutes, or until the pastry is puffed and golden brown.


Serving Suggestions

  • Pair this hearty pie with creamy mashed potatoes, roasted vegetables, or a crisp green salad for a complete meal.

  • Enjoy it with a glass of red wine or a pint of Guinness to complement the rich flavors.


Tips for the Perfect Beef, Mushroom & Guinness Pie

  1. Choose the Right Beef: Opt for beef stew meat or chuck, as these cuts become tender when slow-cooked.

  2. Don’t Skip the Stout: Guinness adds a depth of flavor that makes this dish truly special. If you prefer less bitterness, use a milder stout.

  3. Customize Your Crust: Swap puff pastry for a shortcrust pastry for a more traditional pie.

  4. Thickening Options: Adjust the stew’s consistency by using cornstarch, or allow it to reduce naturally for a more robust flavor.


Why This Recipe Works

This recipe is a perfect combination of comfort and sophistication. The slow-simmered filling becomes rich and savory thanks to the Guinness and beef stock, while the puff pastry crust adds a buttery, flaky texture. It's ideal for cozy family dinners, special occasions, or even meal prepping—you can freeze the filling for a later bake!


Final Thoughts

The Beef, Mushroom & Guinness Pie is a timeless dish that brings the hearty flavors of Ireland to your table. It’s a recipe that satisfies the soul and warms the heart, whether served for a weeknight dinner or a festive celebration. So, roll up your sleeves, grab a pint of Guinness, and savor the deliciousness of this classic comfort food!

Read

The World's BEST Chocolate Chip Cookie Recipe: Chewy, Gooey Perfection

If you're searching for the ultimate chocolate chip cookie, look no further! This recipe is hands-down the best, creating a chewy, melt-in-your-mouth experience that will have you and your loved ones coming back for more. With a few simple ingredients and a touch of cream, this cookie recipe has earned its spot as a household favorite and will likely become your go-to for all cookie cravings.

Why This Chocolate Chip Cookie Recipe is the BEST

These cookies are the perfect balance of soft and chewy, with a rich, buttery flavor. The secret ingredient? A splash of cream. This small addition elevates the cookies, giving them that irresistible melt-in-your-mouth texture. While the basic recipe is delicious on its own, you can easily switch up the flavor by adding pecans, Skor bits, white chocolate chips, or macadamia nuts—whatever you prefer! No matter how you make them, these cookies are sure to become a tradition in your family.

Ingredients for the Perfect Chocolate Chip Cookies:

  • 1 1/3 cups butter (softened)

  • 1 cup granulated sugar

  • 1 cup packed brown sugar

  • 2 large eggs

  • 2 tsp vanilla extract

  • 2 tbsp cream (coffee cream or whipping cream)

  • 1 tsp baking soda

  • 2/3 tsp salt

  • 3 cups all-purpose flour

  • 1 cup chopped nuts (optional)

  • 1 package chocolate chips (or your preferred mix-ins)

Directions: How to Make Chewy Chocolate Chip Cookies

  1. Cream the butter and sugars: In a large mixing bowl, cream the softened butter with both sugars until light and fluffy. This step is crucial for achieving that perfect chewy texture!

  2. Add wet ingredients: Beat in the eggs, vanilla extract, and cream. Mix well until fully incorporated.

  3. Combine dry ingredients: In a separate bowl, whisk together the baking soda, salt, and flour. Gradually add the dry ingredients to the wet mixture, mixing until just combined. Be careful not to overmix to keep the cookies soft.

  4. Add chocolate chips and nuts: Stir in the chocolate chips and any optional add-ins like nuts or Skor bits.

  5. Prepare to bake: Preheat your oven to 375°F (190°C) and lightly grease your cookie sheets. Use a cookie scoop or spoon to drop dough onto the cookie sheet, aiming for 1 1/2-inch-sized rounds.

  6. Bake: Bake for 8 minutes for the first batch, and 6-7 minutes for subsequent batches. The cookies should be golden brown on the edges, with chewy centers. The perfect cookie will still be soft in the middle when you take it out of the oven.

  7. Cool and enjoy: Allow the cookies to cool on the baking sheet for a few minutes before transferring them to a wire rack. Enjoy with a glass of milk or just on their own—they’re irresistible!

Tips for the Perfect Chocolate Chip Cookies

  • Don’t overmix the dough: Overmixing can lead to tough cookies, so mix just until everything is combined.

  • Use cold butter: If you don’t have time to let the butter come to room temperature, using cold butter will still work—just make sure it's soft enough to mix well.

  • Customize your cookies: Feel free to swap in different types of chocolate chips (dark, milk, or white chocolate) or try adding other mix-ins like dried fruit, nuts, or toffee bits.

Final Thoughts: The Best Chocolate Chip Cookies You’ll Ever Make

This recipe is a true crowd-pleaser, and once you make it, you’ll see why it’s called the best! The combination of chewy texture and rich flavor makes it a standout dessert or snack, perfect for any occasion. Whether you’re baking for a holiday, a family gathering, or just because, these cookies will disappear quickly. Bake a batch today and discover your new favorite chocolate chip cookie recipe!

Read

Perfect Roast Lamb with Lemon, Garlic, and Herbs

Ingredients for Easy Lamb Roast

  • 1 cup lemon juice

  • 1 cup white wine

  • 3 teaspoons minced garlic

  • 2 teaspoons rosemary

  • 2 teaspoons Greek oregano

  • 2-3 lb lamb roast (boneless, wrapped in twine)


How to Make a Delicious Roast Lamb

  1. Marinate the Lamb: In a large Ziploc bag, combine lemon juice, white wine, garlic, rosemary, and oregano. Add the lamb roast to the bag, seal it tightly, and refrigerate for at least 6 hours or overnight. This step helps the flavors penetrate the meat, making it tender and full of flavor.

  2. Roast the Lamb: Preheat your oven to 325°F (163°C). Place the marinated lamb in a small roasting pan and pour 1/4 of the marinade into the pan. Cover the pan with foil and bake the lamb for 1.5 hours.

  3. Brown the Roast: After the lamb is cooked through, uncover the pan and increase the oven temperature to 350°F (175°C). Roast for an additional 10 minutes or until the lamb is nicely browned. Alternatively, you can place the roast on a preheated BBQ for a few minutes to get a grilled finish.

  4. Serve and Enjoy: Once the lamb is done, remove it from the oven and let it rest for a few minutes. Slice and serve with your favorite sides, like rice and steamed broccoli. For extra flavor, pair it with tzatziki sauce.


Why This Lamb Roast is So Special

This easy lamb roast is perfect for any family dinner or special occasion. The marinade of lemon, white wine, garlic, and herbs infuses the lamb with rich flavors, making it incredibly tender and juicy. The slow roasting ensures a melt-in-your-mouth experience, while the option to brown the lamb in the oven or on the BBQ gives you the flexibility to achieve the perfect crust.

Tips for the Best Roast Lamb

  • Marinate for Longer: If possible, marinate the lamb overnight for even more depth of flavor.

  • Grill Finish: For that authentic crispy exterior, finish the roast on the grill for a few minutes.

  • Pairing: This roast pairs beautifully with classic sides like roasted vegetables, potatoes, or a fresh salad.


Final Thoughts

This easy lamb roast recipe is the ideal way to enjoy lamb at home. With simple ingredients and minimal preparation, you can create a tender and flavorful roast that will impress your guests. Serve it with rice, roasted potatoes, or your favorite vegetables for a well-rounded meal. Try it next time you want a delicious and simple roast lamb that everyone will love!

Read
Categories:   #LambStew #ComfortFood #OnePotMeals #HomemadeCooking #SlowCooked #EasyDinner #CozyMeals #Foodie #RecipeOfTheDay #DinnerIdeas | Apple roses recipe | Bacon And Egg Pastries | Baking From Scratch | Banana Bread | Basil Tomato Sauce | BBQ lamb roast | bbq recipe | Beef medallion recipe | Beef mushroom Guinness pie | best chocolate chip cookie recipe | Best Italian chicken recipes | Best lemon cupcakes | Best Steak Diane recipe | Best whoopie pies recipe | birthday cake ideas | birthday ideas | butter tarts with raisins | Buttermilk Banana Bread | cake | Cheesy chicken pot pie recipe | Cheesy meat lasagna recipe | Cheesy Stuffed Shells | chicken caprese ravioli | chicken recipe | chocolate chip cookie recipe | Christmas biscotti recipe | Christmas cookie recipes | Cinnamon Rolls | Classic banana bread recipe | classic butter tarts | Classic buttermilk scones recipe | Classic Sangria recipe | Coconut shrimp recipe | Colorful summer salad | Comfort food lasagna ideas | Comfort food pot pie | Cranberry Stuffed Chicken | Cream cheese-filled cookies | Cream CheeseIcing | creamy sweet potato pie | Creamy Tuscan Chicken recipe | Dessert Lovers | dessert recipes | Easy Baking | Easy Breakfast | easy butter tarts | easy cake recipe | Easy chicken burgers | Easy Dinner | easy fish bowl recipe | easy homemade lamb | Easy homemade lasagna | Easy homemade scones | Easy meatloaf recipe | Easy Pasta Sauce | Easy shrimp dinner | Easy shrimp pasta recipe | Easy steak dinner | Easy summer sangria | Elegant apple dessert ideas | family dinner ideas | Family dinner recipes | family recipe | Festive meringues | fish bowl cake | Foodie Favorites | French Canadian Cuisine | Fresh summer side dishes | frog cake | Frosting | GiadaDeLaurentiis | Grandma's pierogi recipe | greek food | Grilled corn salad recipe | Guinness beef stew pie | Hazelnut chocolate biscotti | Healthy Comfort Food | Healthy Eating | Healthy shrimp recipe | Hearty beef stew with puff pastry | Holiday apple dessert recipe | Holiday Recipe | home made pasta | Homemade chicken burger recipe | Homemade Cinnamon Buns | homemade cookies | Homemade Pastry | Homemade peppermint meringues | Homemade Pie | Homemade pierogi | homemade ravioli recipe | Homemade Spaghetti Sauce | Homemade Treats | How to roast lamb | Indian food, butter chicken, easy recipe | Italian biscotti recipe | Italian dinner ideas | Italian Dinner Recipes | Italian Pasta | Juicy chicken burger patties | lamb recipes | Lamb roast recipe | lasagna recipe, make ahead meal, italian food | leftover meatloaf sandwiches. | Lemon cupcakes recipe | Lemon dessert ideas | Mediterranean Flavors | Mushrooms | Parmesan cheese | pasta lover | Peanut Butter Cookies | Penne | Peppermint meringues recipe | Pork And Potato Pie | Potato and cheese pierogi | Prosciutto Ravioli | Protein-packed breakfast ideas | Quick and easy banana bread recipe | Quick brunch recipes | Quick Meals | Quick shrimp dinner ideas | Red velvet whoopie pies recipe | Red wine sangria recipe | Seafood pasta recipes | Simple Dinner | Spaghetti Sauce | Spinach chicken frittata recipe | Sweet potato pie recipe | Thanksgiving dessert recipes, | Tortiere | Traditional banana bread ideas | Traditional scone recipe with sweet milk | Tree | Turkey | Tuscan chicken with spinach and mushrooms | Weeknight Meals
This website may only be used by consumers that have a bona fide interest in the purchase, sale, or lease of real estate of the type being offered via the website. The data relating to real estate on this website comes in part from the MLS® Reciprocity program of the PropTx MLS®. The data is deemed reliable but is not guaranteed to be accurate.